

If you’ve been following along with our basement kitchenette refresh on Instagram, you know it’s been a big transformation.
Before, the cabinets were very dark and dated. The brown laminate countertop and dark, metallic backsplash were anything but on trend, and it was a space that was simply collecting clutter and dust.

With winter approaching, I knew we would be using our basement so much more, so I decided it needed to be the next big project.
It contains our playroom, guest room and guest bathroom, media room, and several storage closets, and lucky for us, it was finished when we moved in. It just wasn’t finished to our liking.
There were lots of thing we could have done like ripped up carpet, changed the layout of the space, and more.
But it’s a basement that will be very well-loved by our small children for years to come, so we decided to tackle the entire space, one very budget-friendly DIY at a time.
Because we want to save our project fund for the big projects like our kitchen and master bathroom.
And because I always love the challenge of transforming a space using as little money as possible. Because it’s always possible!
So with all that said, we decided to begin with our kitchenette in the basement because we had a lot of leftover materials from other projects that we knew we could use.
And I believed the design choices I made for the space would help me design the rest of the spaces, too.
And here’s what we did…

HOW WE COMPLETELY TRANSFORMED OUR BASEMENT KITCHENETTE WITH SIMPLE DIYS, DECOR, AND BY REUSING MATERIALS WE ALREADY HAD
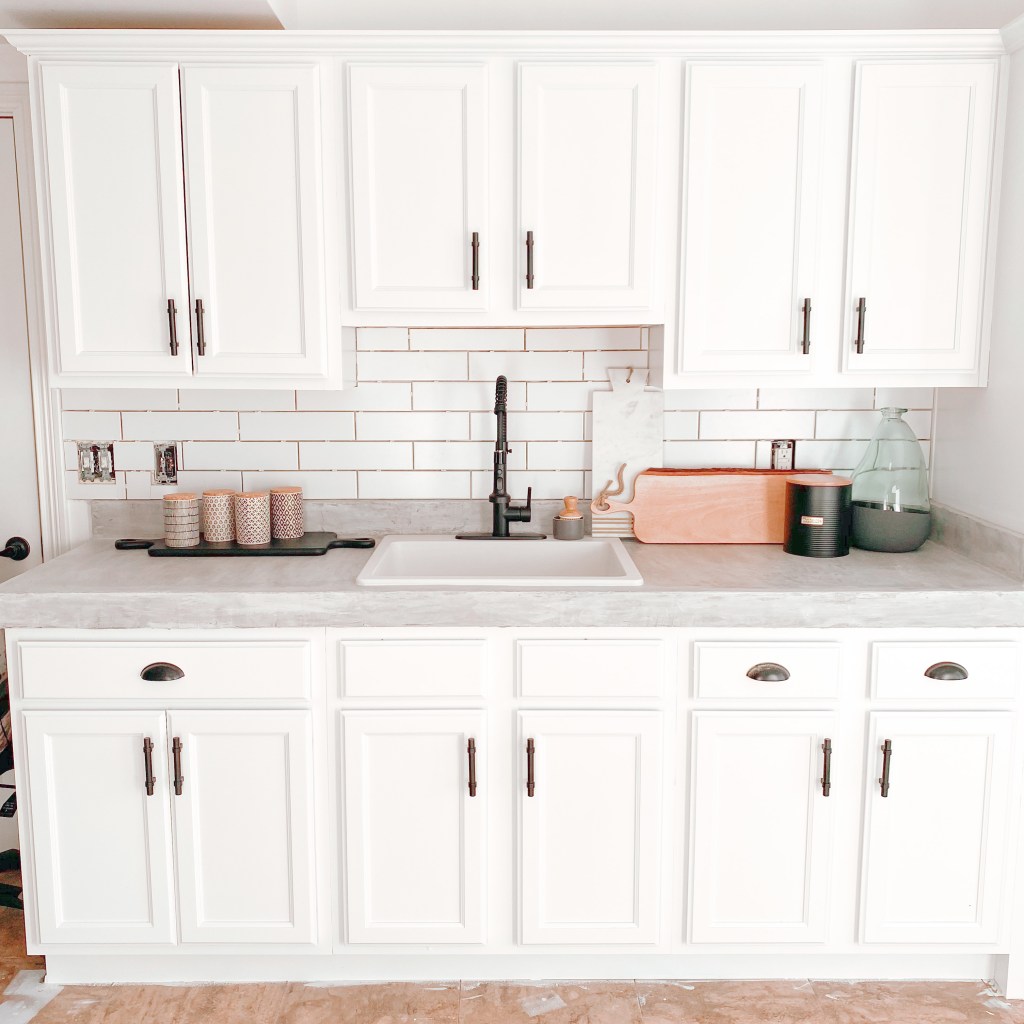
STEP 1: WE PAINTED THE CABINETS

First things first, we knew the cabinets had to be lighter and brighter. They were darkening the entire space.
So we decided to paint them ourselves and switch up the hardware while we were at it!
I created a cabinet painting tutorial with all the details here for you to check out!
We went with the color Pure White by Sherwin Williams, and we ended up going with these cabinet pulls and these drawer pulls! Perfection!
STEP 2: CONCRETE COUNTERTOPS

Once we wrapped up the cabinets, it was time to move on to the countertops.
We had created DIY concrete countertops in our laundry room by simply coating the laminate countertops we had in there with feather finish concrete, and I absolutely loved the outcome!
So we decided that since we had all the tools and leftover concrete from that, it would be a simple and incredible inexpensive way to update the countertops here too!
The only difference is we wanted to replace the sink and faucet in the kitchenette. The previous owners had put in a stainless steel wet bar sink, and I wanted something a little larger and of course a little lighter and brighter.
So I found this Elkay sink that is actually quartz and oh so beautiful (and pretty affordable as far as sinks go). And I went with a black drain to add some contrast.
Then I snagged this faucet on Amazon for less than $50, and it’s so perfect for the style I was going for!
I made sure to cut out a larger hole for my sink using my jigsaw, then I followed this concrete countertop tutorial I wrote when I did my laundry room countertops!
So simple, but such a difference!
STEP 3: UPDATED BACKSPLASH
Of course, once the countertops were updated, it was time to move on to the backsplash!
And again, I had leftover tile from my laundry room, and it happened to be my very favorite elevated subway tile in a pretty matte finish from Bedrosians Tile & Stone.
I just so happened to have leftover Simple Mat and grout too (how lucky is that?), so I got to work with the exact same technique.
The only difference is that this time, it was a much smaller space, so it felt so simple!
I just followed my tile tutorial from before here!
Easy peasy.
STEP 4: DECORATE
Once the tile was done, I knew I wanted to incorporate natural woods with lots of contrasting black and white decor.
I turned to World Market for some key items and found some good ones including…
These amazingly cute canisters.

These three bread boards (click on the photos to shop!).


And this cute cookie jar!

Then, I incorporated one of my DIY dipped vases to complete the look!
AND THAT’S IT!
We already feel like the basement is lighter, brighter, and more our style!
And we love that we were able to reuse so many materials, incorporate things we already had, and truly transform this space!
What do you think?


Leave a Reply