

Let’s talk stenciling! I stencil often. Why you ask? Because it’s the perfect way to transform your floors, walls, or furniture for way less!
I get all my stencils from Cutting Edge Stencils and love their floor stencil and wall stencil collections. They always have something unique to offer, not to mention have stencils that match all the latest on-trend tiles.
So when it came to my daughters’ bathroom floors, there was really only one option. I had to stencil them!

Before, they were a darker gray faux stone tile that both felt and looked faux. I wanted to brighten it up a bit and throw in a little color. After all, it was going to be a girly bathroom, it needed to be light and fun!
So I grabbed my supplies and got to work! And if you’re wondering, this was my 7th floor, so I’ve learned a lot along the way! Here’s my process…

HOW TO STENCIL YOUR FLOORS LIKE A PRO (& GET THE HANDPAINTED TILE LOOK YOU LOVE FOR LESS)
CLEAN, TAPE, AND PREP YOUR TILE
I began by cleaning the floors well and taping up. I like to vacuum well then mop and let the floors dry completely.
Then I grab some painters tape and tape all along the baseboards, leaving a tiny space free before you hit the floors. That way, when you peel your tape up, it won’t take any of the paint with it.
The last thing you want is to remove your tape at the end only to find that you missed that line right up against the wall. Trust me.
The tile on this floor was ultra smooth and slippery, so I was a little worried that applying chalk paint directly to the tile like I usually do might not be enough.

To be safe, I started with a coat of Bullseye 1-2-3 primer! This is my go-to primer because it always sticks on everything! I let that dry completely before moving on to the next step.
APPLY YOUR BASE PAINT
I decided to use Rustoleum Linen White Chalk Paint as the base paint for my floors. I love the slightly off-white hues it has. It’s white without being too bright.

I start by taking a paintbrush and going around all the edges. Then, I use a roller and simply pour paint on the floors as I go to cover the floor with a nice thick coat.
Start from the back of the room, and work your way towards the door so you don’t paint yourself in.
I let each coat dry for around 8-12 hours, then I repeated for my next coats. When I prime first, I tend to need 2 coats of my base chalk paint. If you don’t prime first, then you’ll likely need 3 coats.
Just make sure you have nice, solid coverage before moving forward! And make sure every coat is totally dry before applying the next.
For reference, I used 1 can of white chalk paint for my 2 coats of paint on this floor.
TIME TO STENCIL!
This step is so much fun, but it does require lots of patience! Don’t feel like you have to complete your floor overnight. Allow it to take time and come and go as you feel inspired! It will wait on you!
Also, I promise it gets easier the more you do it!
In order to determine where to start my floor stencils, I like to walk into room and think about where it would be most noticeable to have full, perfect tiles. Usually for me, that means starting in line with the door, but it’s different for every room!
I do recommend starting in the middle of the room, though. You’ll want to do your tiles in the center of the room before moving on to the edges and corners just in case you need to bend, cut, or manipulate your stencil! Because of this, I also recommend purchasing 2 stencils!
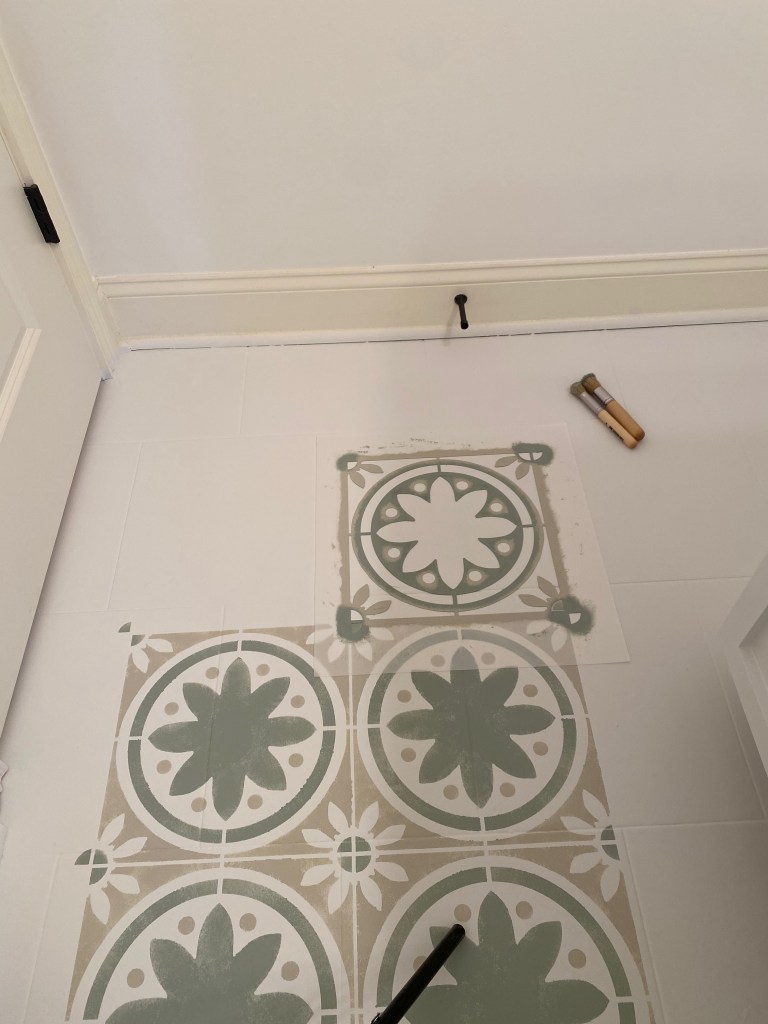
I chose the Primavera Tile Stencil in the 12×12″ size for my floors. My tiles were 13×13″ and staggered, so I decided not to stencil each individual existing tile and instead simply followed the stencil pattern!
I chose to use Early Riser by Magnolia and Gatherings by Magnolia for my paint colors, and I love the little fun but neutral pop in this room now!

Once your pattern is done, you won’t even notice the grout lines you had in your room before! You’ll really only pay attention to the new ones you paint! Kind of crazy how your eyes and mind will follow that new pattern instead.
Once you find your starting spot, you can use painters tape or adhesive spray to hold your stencil in place as you work. I typically just hold it in place with my hands until I get to the stencils around the edges. Then, I pull out the tape!
You can use a dense foam roller or stencil brushes to paint your pattern onto the floor. I typically find the roller goes faster, but you have a higher chance of making mistakes that way. So, I prefer to use stencil brushes!
Use barely any paint on your stencil brushes and tap straight up and down to ensure no bleeding under your stencil. If you’re unsure of how much paint to use, have a paper plate or piece of cardboard on hand, barely dip your brush in the paint, then tap off the extra paint before starting on your stencil.
Do this until you get used to the exact amount of paint you need. It’s a whole lot less than you think!
Get to work, lining up your stencil with the guides on the stencil each time to ensure your pattern is perfect! Once your floor is done, allow it to dry completely then move on to the next step!
For more on stenciling how-tos, check out this blog post all about stenciling!
SEAL, SEAL, & SEAL AGAIN
Once you’re done stenciling, allow the paint to dry for 12-24 hours, then begin sealing your floors with a water-based topcoat! I used this sealant for my floor. It’s the only one I really trust completely!
Depending on how much water you think will come into contact with your floor, you’ll want to apply quite a few coats of poly. I ended up coating my floor with 3-4 thick coats of poly to be safe.
After all, you don’t want your floors to chip or wear right away after all that work!
Allow each coat of poly to dry 8-12 hours before applying the next. I simply painted it on with a soft paintbrush to get a thick layer. Easy breezy! I avoid rolling it because you get too thin of coats when you roll! Don’t worry about brush strokes – if you add a thick layer, it will level out on your floor before drying!
Each coat only took me about 15 minutes!
Allow your floor to cure for 48 hours after you apply your final coat of poly before setting any heavy furniture on it!
TO WRAP IT UP

The floors made a huge difference! Then it just came down to the details which will be ever-evolving. But if you’re searching for the perfect project to update your floors without spending an arm and a leg on new tile – I encourage you to start by stenciling!
It’ll get your creative juices flowing, and you’ll be amazed at the transformation you can make!
Let me know what you think in the comments!


It looks amazing! Thanks for the tips!
Thanks so much, Jackie!